Kitchenaid Pasta Extruder Review | KPEXTA Pasta Press
Last updated: April 2026
Are you in the market for a new pasta extruder? Perhaps you want to make homemade pasta – fresh pasta at home. Well today, I’m gonna be telling you all about my experiences using the KitchenAid Pasta Extruder set and some of the pros and cons as well as some of my tips for how to use it.
Key Takeaways
- The KitchenAid KPEXTA Pasta Extruder produces six pasta shapes — spaghetti, bucatini, rigatoni, large macaroni, small macaroni, and fusilli — making it best for tube and specialty-shaped pasta.
- It attaches to any KitchenAid stand mixer with a front power hub, making setup quick and familiar if you already own other KitchenAid attachments.
- Key drawbacks include difficult cleaning, ~1–2 tablespoons of dough waste per batch, plastic (not bronze) dies, and noticeable motor strain on lower-powered mixers like the Artisan (approx. 350 watts).
- For flat pasta like fettuccine or lasagna sheets, the KitchenAid Pasta Roller & Cutter Set is generally easier to use and requires less hands-on management.
- Best results come from using the included dough recipes, running the mixer at full speed (level 10 on the Artisan), and dusting extruded pasta generously with flour immediately after cutting.
What’s in the Box of the KitchenAid Pasta Extruder (KPEXTA)?
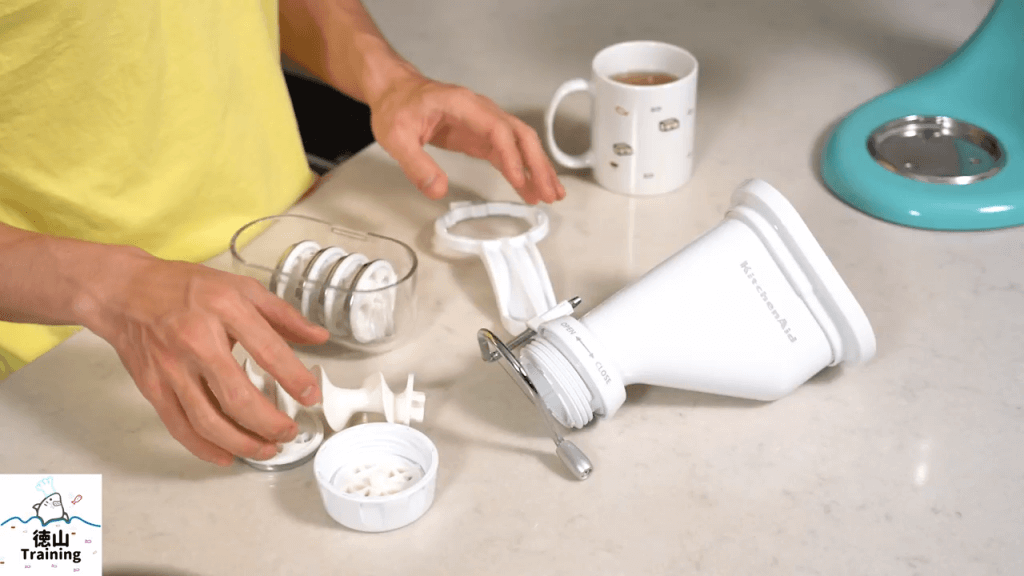
The KitchenAid KPEXTA Pasta Extruder set includes six interchangeable pasta-shaping dies, a plastic wrench/pusher tool, and a stainless steel housing unit — a compact package that stores easily and covers the most popular extruded pasta shapes.
If you’ve ever had fresh pasta, you may have noticed that it goes better with certain sauces than others. But again, that may be personal preference. That is one of my reasons for making my own fresh pasta at home, as opposed to always using the dried kind. And that’s exactly one of the reasons why I got this pasta extruder set (Best for: making tube-shaped and specialty extruded pasta at home using a KitchenAid stand mixer).
The six pasta dies included in the set produce:
- Spaghetti — thin, round noodles
- Bucatini — thick hollow noodles with a channel running through the center; bucatini (boo-kah-TEE-nee) is a traditional Roman pasta similar to spaghetti but with a small tunnel through its length, ideal for oil-based and light cream sauces
- Rigatoni — large ridged tubes; rigatoni (rig-ah-TOH-nee) is a southern Italian tube pasta with ridged sides designed to capture chunky meat and tomato sauces
- Large Macaroni — curved tube pasta
- Small Macaroni — smaller curved tube pasta
- Fusilli — spiral-shaped pasta; fusilli (foo-ZEE-lee) is a corkscrew-shaped pasta whose coiled surface traps pesto, chunky vegetables, and thicker sauces effectively
The plastic wrench/pusher tool is included for good reason — the bottom cap can become tightly stuck after extrusion and the wrench provides the leverage you need to remove it. That’s essentially everything the box contains; it doesn’t take up much storage space at all.
How Do You Use the KitchenAid Pasta Press (KPEXTA)?
Using the KitchenAid pasta press is straightforward: select and insert your die, assemble the housing by setting the auger into the cross-shaped mount and screwing the cap on tightly, attach the unit to your stand mixer’s front power hub, drop in small dough balls, and run the mixer at full speed.
Whenever you decide you want to make spaghetti, for example, all you’re going to do is put the little end piece in the bottom part. Then it will put this little “pusher” — it looks kind of like a drill — into the housing. There’s actually a little cross where this gets set in. You’re just gonna go ahead and put it in like that.
Make sure that it is set into the cross so you can see that it’s all the way in because it’s flush with the top. Then you’re gonna put the cap on — the cup aligns with the bottom piece (the cutter) — and you’re going to screw it on super tight, as tight as possible. You can use the wrench to tighten it, but I usually just use the wrench to take it off. Then all you have to do is attach it to your stand mixer and put in the dough. The dough goes in the top part right there, and that’s essentially it.
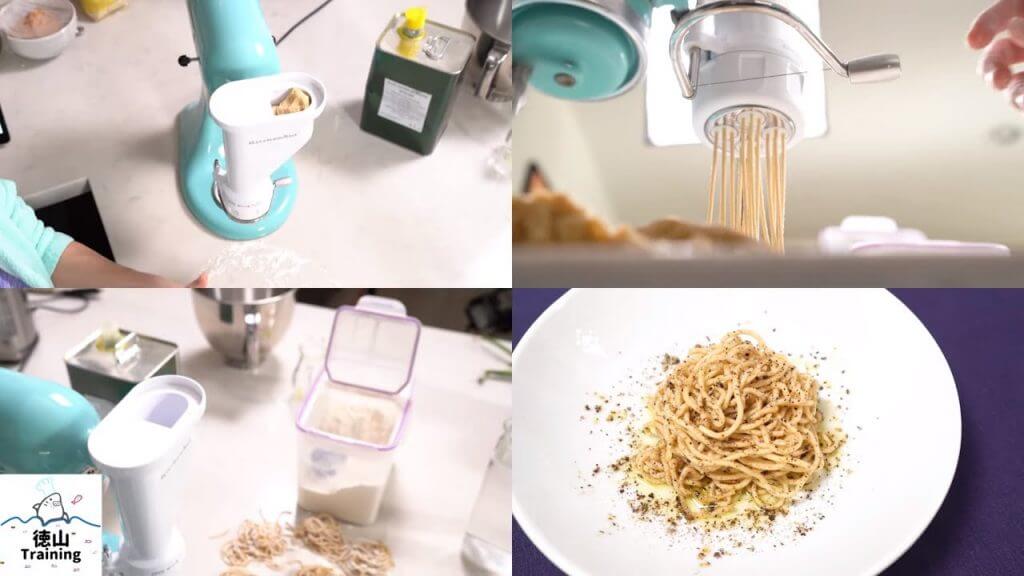
If you have a KitchenAid stand mixer and some attachments, it’s pretty much the same as any other attachment. You just attach it on there and then put the screw back in so it stays in place. You turn it on and then it’ll start to extrude. When I’m ready to extrude the pasta with the KitchenAid gourmet pasta press, I put the speed all the way to ten.
This is the Artisan KitchenAid stand mixer (Best for: everyday baking and moderate pasta making; approximately 350 watts), so it doesn’t have that much power. Because of that, I’m actually upgrading to a bigger stand mixer, which is going to have 1.3 horsepower — way stronger than this little thing. We’ll do a test and compare the results of each in a future video. But that’s essentially it in terms of using it.
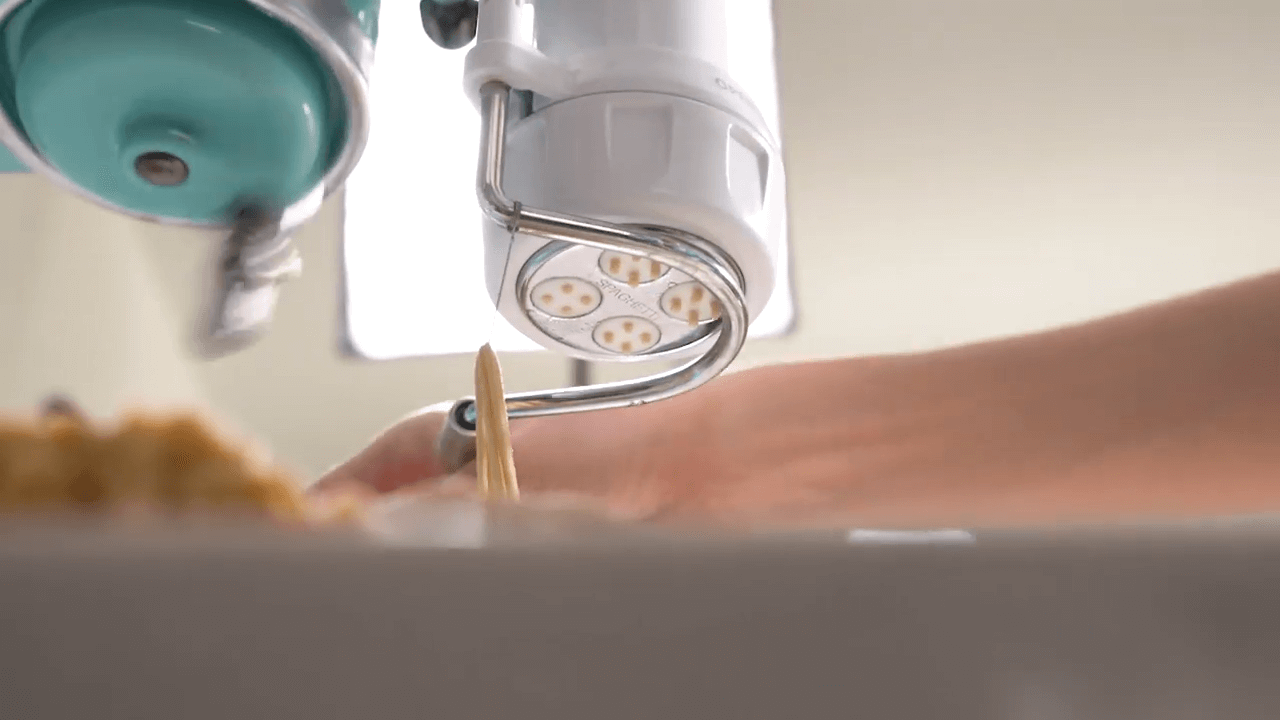
Once the extruded pasta comes out — once you get the desired length, say 12 inches — all you have to do is cut it with the steel wire cutter. This is a pretty firm steel wire, so it’s gonna cut quickly. Then you let it continue extruding to the desired length and cut again.
The important thing when cutting: the wire must be properly aligned with the die holes. If you don’t line it up correctly, the steel thread will block some of the holes, causing clumping and deformed pasta. Pay close attention to this, especially when you’re just starting out — that’s one of my top tips!

What Are the Cons of the KitchenAid Pasta Extruder?
The KPEXTA has five notable cons: it is difficult to clean, wastes a small amount of dough per session, uses plastic rather than bronze dies, strains lower-powered stand mixer motors, and requires more hands-on attention than the flat pasta roller and cutter set.
Con 1 — Difficult to clean: The bottom piece gets very difficult to remove and pasta dough gets stuck — not only between the threads on the cap and housing body, but also inside the center alignment hole, which isn’t fully flush. There’s always pasta stuck on the bottom part by the time you’re done. That’s why the wrench is included, and you’ll use it every single time.
Con 2 — Dough waste: You will consistently waste approximately 1–2 tablespoons of extruded pasta dough per session. Because there’s nothing behind the last of the dough to push it through, it never fully clears the die. It’s a small but unavoidable loss with this design.
Con 3 — Plastic dies, not bronze: The frame is stainless steel, but the actual shaping dies are plastic. Ideally, dies would be made from bronze — bronze pasta dies are extrusion molds machined from bronze alloy that impart a micro-rough, porous surface texture to extruded pasta, which helps sauce cling to each strand or tube for a more flavorful bite; they are standard in traditional and artisan Italian pasta production. Bronze die extrusion is why premium dried pasta brands command higher prices. A bronze-die version of this attachment would be a meaningful upgrade that KitchenAid should consider.
Con 4 — Motor strain and noise: At full speed on the Artisan, you can clearly hear the 350-watt motor laboring under the load of extrusion. The mixer audibly slows and whirs more heavily when dough is being pushed through the dies. A more powerful stand mixer will reduce or eliminate this issue.
Con 5 — More hands-on than the roller/cutter set: I expected the extruder to be simpler and less fussy than the cutting set — it wasn’t. The KitchenAid Pasta Roller and Cutting Set (Best for: flat pasta shapes including fettuccine, spaghetti-style sheets, and lasagna — handles cutting automatically) is actually easier to operate in practice. With the roller set, cutting is automatic; with the extruder, you’re continuously feeding small dough balls and manually cutting the pasta as it extrudes. It requires more active attention throughout the process.
What Are the Pros of Using the KitchenAid Pasta Press?
The KPEXTA’s strongest advantages are its simplicity of operation, variety of six pasta shapes, universal compatibility with KitchenAid stand mixers, and compact storage size — plus, it genuinely works.
Pro 1 — Simple to use: Attach, add dough, switch on — pasta comes out. There’s no complex rolling technique or calibration needed to produce your first batch.
Pro 2 — Six pasta shape options: The included dies cover real variety: spaghetti, bucatini, rigatoni, large macaroni, small macaroni, and fusilli. If you enjoy pairing different pasta shapes with different sauces, this gives you meaningful flexibility.
Pro 3 — Works with any KitchenAid stand mixer: The KPEXTA is compatible with any KitchenAid stand mixer that has a front power hub attachment port — Artisan, Classic, Pro Line, and others. If you already own a KitchenAid mixer, you don’t need a separate machine.
Pro 4 — Makes fresh extruded pasta accessible: Without an attachment like this, producing tube-shaped extruded pasta at home would require a dedicated manual crank extruder — which is slower and more physically demanding. This attachment automates the process significantly.
Pro 5 — Compact footprint: The entire set — housing, six dies, and wrench — stores in a relatively small space. Nothing bulky or sprawling to deal with.
Pro 6 — It works: With the right dough consistency and technique, the KPEXTA reliably produces fresh extruded pasta. That’s the bottom line.
KitchenAid Pasta Extruder vs. Pasta Roller & Cutter Set: Side-by-Side Comparison
Deciding between the two main KitchenAid pasta attachments? Here is a direct comparison to help you choose:
| Feature | KPEXTA Pasta Extruder | KPRA Pasta Roller & Cutter Set |
|---|---|---|
| Best for | Tube & specialty shapes (rigatoni, fusilli, bucatini, macaroni, spaghetti) | Flat pasta (fettuccine, spaghetti sheets, lasagna) |
| Number of shapes | 6 (via interchangeable dies) | 3 (sheet roller + fettuccine + spaghetti cutters) |
| Ease of use | Moderate — requires feeding small dough balls and manual cutting | Easier — continuous feeding; auto-cuts flat noodles |
| Cleaning difficulty | High — dough traps in threads and center alignment hole | Moderate — let dough dry, then brush off |
| Die/cutter material | Plastic dies; stainless steel frame | Stainless steel rollers and cutters |
| Motor demand | High — may audibly strain mixers under ~500W | Moderate |
| Dough waste | ~1–2 tbsp per batch | Minimal |
| Storage size | Compact | Moderate |
| Unique capability | Only way to make hollow/tube pasta at home with a KitchenAid | Produces smooth, thin, consistent flat sheets and noodles |
Five Tips for Getting the Best Results from the KitchenAid Pasta Extruder
These five tips will help you produce better pasta from your very first session with the KPEXTA, whether you’re brand new to pasta making or upgrading from a manual crank machine.
Tip 1 — Start with the included manual recipes. Use the extruder pasta dough recipes from the instruction booklet that comes with the attachment. These recipes are specifically formulated for extrusion — the hydration level and flour ratio are calibrated for this machine. Get comfortable with the reference dough before experimenting, so you know what the correct texture and consistency should feel like going in.
Tip 2 — Experiment with different flours and mix-ins. Try combining semolina flour with all-purpose flour for different textures, or add vegetables and herbs directly to the dough — tomato, spinach, basil, or shiso all work well. A grain mill (Best for: milling fresh whole-grain flour at home for bread and pasta; produces flavors not possible with commercial pre-milled flour) can open up a wide range of fresh-milled flour options that add complexity to your pasta.
Tip 3 — Use small dough balls and keep the feed consistent. When you put the dough in, use very small balls that fit the opening, and push them down firmly. When the mixer speeds back up without extruding, that’s your signal that the auger has run out of material — push the dough down more to resume extrusion.
Tip 4 — Use plenty of flour and consider a drying rack. Dust extruded pasta generously with flour as it comes out so pieces don’t clump or stick together. If you’re making multiple batches or want to save pasta for later, use a pasta drying rack. The KitchenAid Drying Rack (Best for: hanging and air-drying fresh pasta between batches or before storage; holds up to approximately 3 lbs of pasta) opens up and gives you enough room to hang pasta while you run another batch.
Tip 5 — Run the mixer at full speed and align the cutter wire carefully every time. Use the highest speed setting — level 10 on the Artisan. When cutting, make absolutely sure the steel wire is precisely aligned with the die holes before drawing it across. A misaligned wire will partially block holes, causing the pasta to clump and deform. This becomes second nature with practice, but it requires deliberate attention until it does. I’ll report back on the ideal speed setting when I test the Pro Line model.
[embedyt] https://www.youtube.com/watch?v=cj_qf2DR3tA[/embedyt]
Conclusion
Whether you’re a seasoned pasta maker or a beginner, using an extruder is a fantastic way to create unique and delicious pasta shapes in the comfort of your own home.
But wait, there’s more! The KitchenAid (KPEXTA) Stand-Mixer Pasta-Extruder is another type of pasta extruder that’s worth mentioning. This attachment allows you to create six different pasta shapes, including bucatini, fusilli, and large or small macaroni. The possibilities are endless with this versatile extruder.
And if you’re feeling adventurous, why not try making homemade pasta for Soba Noodles, Creamy Mentaiko Pasta, or Homemade Bucatini with Fresh Herbs and Zesty Breadcrumbs.
So, grab your extruder attachment or stand-mixer pasta extruder, get creative with your dough, and enjoy the delicious results!
Question of the day: Have you ever made fresh pasta before? Or if you haven’t made it yet, have you tasted fresh pasta and know exactly how awesome and delicious it can be? Let me know in the comments below, and what kind of pasta sauce you had that experience with — or what kind of pasta sauce you’d be interested in trying your freshly homemade pasta with.
Frequently Asked Questions: KitchenAid Pasta Extruder (KPEXTA)
Is the KitchenAid KPEXTA Pasta Extruder worth buying?
The KPEXTA is worth buying if you want to make tube-shaped and specialty pasta — rigatoni, fusilli, bucatini, macaroni — at home and already own a KitchenAid stand mixer. It is compact, reasonably simple to operate, and produces shapes you genuinely cannot make with a flat roller. However, if your primary goal is flat pasta like fettuccine or lasagna sheets, the KitchenAid Pasta Roller & Cutter Set is easier to use, easier to clean, and better suited to those shapes.
What pasta shapes does the KitchenAid Pasta Extruder make?
The KPEXTA comes with six interchangeable dies that produce: spaghetti, bucatini (hollow-center), rigatoni (large ridged tubes), large macaroni, small macaroni, and fusilli (spiral). These are extruded shapes — meaning they can only be produced by forcing dough through a die, not by rolling and cutting flat sheets.
How do you clean the KitchenAid pasta extruder after use?
Cleaning the KPEXTA is its most frustrating aspect. Dough works into the threads of both the cap and the housing body, and gets lodged around the center alignment hole. Use the included plastic wrench to loosen and remove the bottom cap. The most effective strategy: allow any remaining dough to dry completely before attempting to remove it. Dried dough is far easier to pick or brush out than wet, sticky dough.
Does the KitchenAid pasta extruder work with all KitchenAid stand mixer models?
Yes — the KPEXTA is compatible with any KitchenAid stand mixer that has a front power hub (the attachment port on the front of the mixer head). This includes the Artisan, Classic, Pro Line, and other series models. Note that lower-powered mixers such as the Artisan (approximately 350 watts) may strain noticeably and slow during extrusion. A higher-wattage or higher-horsepower model handles the load more comfortably with less audible motor stress.
What is the difference between the KitchenAid pasta extruder and the pasta roller and cutter set?
The pasta extruder (KPEXTA) works by forcing dough through shaped dies under pressure to create tube-shaped and specialty pasta. The pasta roller and cutter set (KPRA) works by progressively thinning dough into flat sheets, then feeding those sheets through cutter attachments to produce flat noodles like fettuccine or spaghetti. The roller/cutter set is generally simpler to operate, produces cleaner results for flat shapes, and is easier to clean. The extruder is the only way to produce hollow or spiral pasta shapes at home without a dedicated standalone extruder machine.