
Are you in the market for a home grain mill? Perhaps the Mockmill 200 series? And if you are, today, you’re in luck because what we’re going to be doing is a short product review, and I’m going to tell you a few pros and cons, as well as a few tips of mine for using this particular grain mill.

This Mockmill 200 is one of the grain mills that you can get on the market today, and there are several competing products such as Komo, of which, I actually have their Oat Flaker, the Flocman, which is in a different review. That’s specific to making rolled oats. But it can also do grains as well, although it doesn’t turn them into flour.
Which is why you need a separate device like this one, the Mockmill 200 which is going to do exactly that.
What can the Mockmill 200 do?
This does a good job with any kind of dry grain or hard grain, like wheatberry, for example. You can also do legumes.
You can do seeds that are not oily. Sesame seeds, poppy seeds, flaxseed would be no good because they’re oily, and they would get stuck and cause oils to accumulate inside the stone burs, or the stone grinding things, whatever you call them.
Package Inclusions
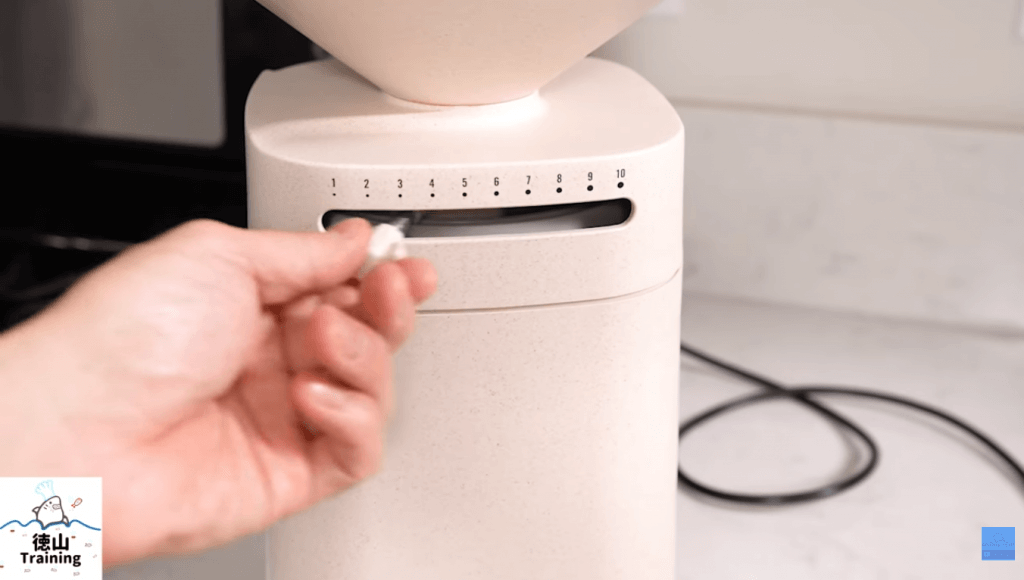
What this comes with is not too much. It comes with what you’re looking at right here, the lid, the power cord, and a manual. So, not too much to it. What you’re looking at on the side is the adjustments for coarseness.
I use it on number one for my bread-making. I make a lot of bread and that’s one of the reasons why I bought this. And I keep it at one. But if you want something more course, you can go to 10, and that’ll be more of a coarser flour.
For something like cornmeal or grits, that would be an option for you.
Why I got this Device
- For nutrition. I’m trying to be healthy by baking my own bread at home.
- Makes whatever you’re cooking taste better. This will make your bread or whatever it is that you’re using your flours for not only taste better but be more nutritious because the grains are freshly milled. All the nutrients and stuff in there haven’t had a chance to oxidize and deteriorate because they’ve been sitting on a shelf or they’ve been processed some way to help them last longer and be more shelf-stable. You will get freshly-milled grains. They’re gonna taste better. They’re more nutritious. They’re also a little bit more aromatic as compared to something that’s been sitting on the shelf.
- Variations. There are a lot more variations and options in terms of the types of grains that you can use. I bought about 10 different Grains to experiment with, like emmer. Emmer is a type of wheat. You can also get rye, which is another type of wheat. You can also get kamut, spelt, or durum wheat. You can get hard red wheat, you can get soft wheat, you can get red fief wheat. There are all kinds of different grains that you can experiment with like I just mentioned. With those different grains, they all have different flavors, different nutrients, different textures, because of the protein content. It’ll keep you pretty busy.
Even if you like baking a lot, there are endless combinations with all those different grains and flours that you can make. Chances are, you’re gonna be pretty busy for a pretty long time if you’re open to experimenting with all those different types of grains.
Pros for the Mockmill 200
- It’s simple to use. All you got to do is plug it in, and there’s a switch here for on and off. Usually, I turn it on, first and then I pour in the grains That’s all there is to it. (Note: Make sure you have a bowl or something to catch the flour after it comes out so you don’t make a mess).
- It’s well-built. It’s somewhat heavy. Make sure that you’re carrying it the correct way. That’s why they put a little sticker on top so that you don’t carry it by the hopper, which is not good, and if you carry it by the chute, it could potentially break.
- It has a spout. That’s a good thing because it helps to direct the milled flour into your container. You’ll want to use a container that’s somewhat close to the edge of the spout so it doesn’t spill out anywhere.
- Aside from whole grains, you can also use it for non-oily seeds, legumes, and even spices like cinnamon, maybe cardamom, or other hard spices would work in here as well. (But it might make your flour taste spicy. So I don’t use it specifically)
- It doesn’t require any cleaning. It’s a self-cleaning grinder. if for whatever reason you get stuff stuck in there, some off flavors, what you can do is change it to the coarse setting, put in some rice or some other grains, and then let it go for a little bit. And then, change it back to your fine setting, and it’ll be clean.
- Simple to transport. There’s actually a locking function. You can actually lock the stones in place So they don’t damage each other if, for whatever reason you need to take it to your friend’s place or somewhere else.
- It comes with a 12-year warranty. 12 years is a long time. It’s more than a decade. For 12 years, they’ll fix something, if something goes wrong, if something goes defective, which is pretty unheard of these days. Usually, you’ll get like a one or two-year warranty, maybe a three or five-year warranty depending on what you’re getting, but 12 years is pretty rare.

Cons for the Mockmill 200
- Even though I think this chute is good, I think it could be improved. Sometimes, the flour gets stuck here in the bottom. I usually just tap it a little bit to get all of it out. I think that’s something that could be improved.
- It’s noisy. I have a coffee grinder, which is noisy, but it’s not as noisy as this. This is probably about twice as loud as my coffee grinder, at least, especially so if you leave the lid off. So, you only always want to put the lid on. If you have something to dampen the sound, maybe some sort of like a sound dampener, that would help to make it less noisy. If you’re gonna be using it all the time, maybe you want to put some earplugs in to protect your hearing.
- It takes up a pretty good amount of space. Depending on how high your cabinets are, it may or may not fit underneath. some of my appliances do not fit like my Vitamix is too tall to fit under here. Depending on how tall your cabinets are, this may or may not fit.
- It’s a very specialized device. If you have no need to mill your own flours, or no desire to mill your own flours, then this is probably not for you. You can’t use it for much else aside from the spices or the non-oily seeds. Oily seeds, you cannot do in here. So that’s any kind of nuts which have oils and fats. Flaxseed, sesame seeds, poppy seeds, are no good.
- It tends to heat the flour slightly. You’ll notice if you’re doing a pretty large batch of flour. Maybe like a pound of flour, for example. You’ll notice that straight away, even at the very beginning. The flower is a little bit on the warmer side. So, that’s not ideal. Obviously you want it to be room temperature or cool. If it’s warm, then potentially some of the nutrients may deteriorate because they’re getting warmed up. So that’s not necessarily a good thing.
- It’s not intended for extended use. This is supposed to be used at home. If you have a small bakery, for example, you might want to get the professional version, which can be run I think indefinitely. But I think this is like 12 or 14 minutes at the most. You’re supposed to let it rest for a little bit. It’s not for commercial use.
Those are my pros and cons. Let me know what you guys think.
Have you ever had freshly-milled flour and use that for any kind of baked goods? Or maybe you’ve gone to like an artisan bakery where they mill their own flours, and maybe you’ve noticed that it tastes quite different in a good way? Let me know in the comments below. And if you haven’t, let me know if you think you’ll be trying one of those places out or maybe even doing it yourself at home.


Konnichiwa! (Hello!) I'm Pat Tokuyama, a Japanese tofu cookbook author, who travels for music, food, and adventure. If you like Japanese tea, checkout some of the newestorganic japanese tea, matcha bowls and noren and more!
** Curious about the Plant Based Japanese Cooking Club? ** Learn more here!
Tips for using Mockmil 200
- Make sure that you’re using a bowl that’s somewhat close to the spout so that it doesn’t spillover. What tends to happen, at least when I use my stainless bowls, is that the flour, if I’m not rotating the bowl, for example, even though the flour is going to start to build up and become like a little mountain, it’s gonna still spread out. But maybe if you’re using a smaller bowl, you might need to rotate it as the bowl fills, so keep that in mind.
- Make sure that you calibrate the stones first. The fine setting is actually at the finest setting, and you’ll be able to know that when you’re setting this up. It’s going to make an audible noise. There’s actually tutorials that you can find online that show you exactly how you’re supposed to calibrate the stones so that you’re getting the finest setting possible.
- Use organic grains if possible. Try to source organic grains There’s plenty of places where you can get it online. That way, you’re getting the healthiest type of grain that you can use. If you can’t get organic, then get non-GMO, non-genetically modified grains, at least. And that’ll get you the most nutritious and I guess chemical or pesticide-free grains that you can get.
- Try different grains. So one of the benefits is the freedom or I guess the flexibility that you have in terms of choices. At the supermarket they can’t carry like 10 or 20 different types of flours because they probably not have that high of a turnover to get through all those different types. But because you’re using whole grains, because they haven’t been cut open or processed in any way, they’re going to be more shelf-stable than flour. So, you can try a bunch. I actually bought like over ten different types of whole grains when I got this initially, and I’ve gradually tested all of them. And they all taste different in their own unique and delicious way.
- Weigh your ingredients. Use a scale as you’re milling your flour so you know exactly how much to mill. Because if you overmill, you’re gonna be left with extra flour, which you want to use right away because that’s the whole point of milling your flour is to keep the nutrition, and also the flavor, and the aroma, which is going to be lost if you just let it sit in your pantry. So, always make sure to use a scale. I think that’s going to be it.


Konnichiwa! (Hello!) I'm Pat Tokuyama, a Japanese tofu cookbook author, who travels for music, food, and adventure. If you like Japanese tea, checkout some of the newestorganic japanese tea, matcha bowls and noren and more!
** Curious about the Plant Based Japanese Cooking Club? ** Learn more here!